[ Here are test splash screens I have created in Sony Vegas Pro]
Introduction Test:
Coming Soon Test:
I will be adding sounds and changing the Coming soon text to "Coming this June" or something along those lines (most likely the date of the showcase). I will also be changing the effects and fonts of the team members names.
Credits Test V1:

This is a blog to show my college work to provide evidence and to build my portfolio. It will also allow students in my class to give me constructive criticism and feedback.
Monday, 14 June 2010

Wednesday, 9 June 2010
Storyboard Models - Spaceship
For my teams trailer we each were given a scene to model and animate, in my scene there is a spaceship involved so here is the model I created:

I began with using a box, by selecting sides I will be extruding and shaping the ship into shape. Here I created the wings for the spaceship and the tail using simple intrude, extrude and vertexes.


To drag the wings to a point I selected the edges of the wings with vertex's then using the move tool I dragged the wings backwards.

I can now add textures the the ship and create a final render.
(textured ship unfinished)

I began with using a box, by selecting sides I will be extruding and shaping the ship into shape. Here I created the wings for the spaceship and the tail using simple intrude, extrude and vertexes.


To drag the wings to a point I selected the edges of the wings with vertex's then using the move tool I dragged the wings backwards.

I can now add textures the the ship and create a final render.
(textured ship unfinished)
Tuesday, 8 June 2010
Enviroment Texture
I started my texture design by opening the previous texture I created that would model my enviroment, from this I could create my texture design.

I then searched for gravel textures and using different gravel textures added and blended them into posistion on my design.

After playing around and adding different gravel textures to my design I added a water texture to act as the river in my enviroment.

I darkened the edges of the river to give it more depth for when it was used on my enviroment.

This is the final texture design, the green on the bottom right is there because I will be adding trees to that area, here is what the texture looks like on my enviroment:


I then searched for gravel textures and using different gravel textures added and blended them into posistion on my design.

After playing around and adding different gravel textures to my design I added a water texture to act as the river in my enviroment.

I darkened the edges of the river to give it more depth for when it was used on my enviroment.

This is the final texture design, the green on the bottom right is there because I will be adding trees to that area, here is what the texture looks like on my enviroment:

Wednesday, 7 April 2010
Unit 4 - Logo & Merchandise
For Unit 4, our team members each created logo's that we would chose between to use for our game, mine was chosen and this is what I created:

Here is the Tshirt merchandise that I have created in photoshop, it shows the name of our game and the logo.


Here is the Tshirt merchandise that I have created in photoshop, it shows the name of our game and the logo.

Tuesday, 6 April 2010
Modelling my enviroment
Using the displace modifier I creating my landscape, after creating a photoshop texture as the base of my displacement for the landscape this is the result:

I then coloured in the texture using images from the internet and default textures in photoshop, I added this texture to my landscape model.

Here is the textured landscape I will soon be adding a city to this with trees and a skybox:

Here is the cityscape I have created to add to my enviroment, I will be making this city looked destroyed to match my apocolyptic theme and plans.

Here is the destroyed city I have added to my enviroment, to do this i used the noise modifier to make the buildings look unstable and rotated most of the building on there side and under the ground.

Here is what the enviroment looks like with trees added to get these trees I used the AEC Extended Foilage object type to add premade trees, I have rotated to trees as if they were knocked over as if a earthquake as just hit. (explaining the destroyed city)


I then coloured in the texture using images from the internet and default textures in photoshop, I added this texture to my landscape model.

Here is the textured landscape I will soon be adding a city to this with trees and a skybox:

Here is the cityscape I have created to add to my enviroment, I will be making this city looked destroyed to match my apocolyptic theme and plans.

Here is the destroyed city I have added to my enviroment, to do this i used the noise modifier to make the buildings look unstable and rotated most of the building on there side and under the ground.

Here is what the enviroment looks like with trees added to get these trees I used the AEC Extended Foilage object type to add premade trees, I have rotated to trees as if they were knocked over as if a earthquake as just hit. (explaining the destroyed city)


Tuesday, 16 March 2010
Enviroment Planning
Here is what I plan to create in my 3D enviroment, here is my enviroment sketch soon to be coloured and digitalised then made again in 3D Studio Max:
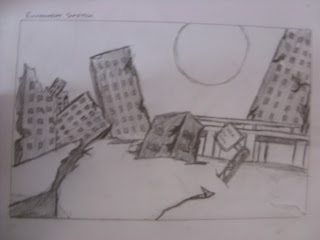
Below is a coloured version of the enviroment I drew, we had to split the paper into four with four different types of colouring, pastels, crayon, felttip and pencil. I personally think I messed up and made the picture look bad and think it may have looked alot better if I coloured it all in crayon, anyways here it is:

Here is the digitalised version of the enviroment done in Photoshop, I've been doing alot of greyish storyboards lately so I thought I would do a grey enviroment, I quite like the colour.

Here is the 3D design of the destroyed enviroment created in 3D max:


Below is a coloured version of the enviroment I drew, we had to split the paper into four with four different types of colouring, pastels, crayon, felttip and pencil. I personally think I messed up and made the picture look bad and think it may have looked alot better if I coloured it all in crayon, anyways here it is:

Here is the digitalised version of the enviroment done in Photoshop, I've been doing alot of greyish storyboards lately so I thought I would do a grey enviroment, I quite like the colour.

Here is the 3D design of the destroyed enviroment created in 3D max:

Subscribe to:
Posts (Atom)